Multi-platform RabbitMQ Deployment
With ZeroMQ based VOLTTRON, multi-platform communication was accomplished in three different ways:
Direct connection to remote instance - Write an agent that would connect to a remote instance directly.
Special agents - Use special agents such as forward historian/data puller agents that would forward/receive messages to/from remote instances. In RabbitMQ-VOLTTRON, we make use of the Shovel Plugin to achieve this behavior.
Multi-Platform RPC and PubSub - Configure VIP address of all remote instances that an instance has to connect to its $VOLTTRON_HOME/external_discovery.json and let the router module in each instance manage the connection and take care of the message routing for us. In RabbitMQ-VOLTTRON, we make use of the Federation Plugin to achieve this behavior.
Terminology
For all the three different ways of setting up multiplatform links, we first need to identify the upstream server and downstream server. The upstream server is the node that is publishing some message of interest; we shall refer to this node as the publisher node. The downstream server is the node that will receive messages from the upstream server; we shall refer to this node as the subscriber node. Note that upstream server & publisher node and downstream server & subscriber node will be used interchangeably for the rest of this guide.
Using the Federation Plugin
Connecting multiple VOLTTRON instances can be done using the federation plugin. To create a RabbitMQ federation, we have to configure the downstream volttron instance to create federated exchange. A federated exchange links to other exchanges. In this case, the downstream federated exchange links to the upstream exchange. Conceptually, messages published to the upstream exchanges are copied to the federated exchange, as though they were published directly to the federated exchange.
Path: $VOLTTRON_HOME/rabbitmq_federation_config.yml
# Mandatory parameters for federation setup
federation-upstream:
  volttron4: # hostname of upstream server
    port: '5671'
    virtual-host: volttron4
    certificates:
        csr: true
        private_key: "path to private key" # For example, /home/volttron/vhome/test_fed/certificates/private/volttron1.federation.pem
        public_cert: "path to public cert" # For example, /home/volttron/vhome/test_fed/certificates/federation/volttron2.volttron1.federation.crt
        remote_ca: "path to CA cert" # For example, /home/volttron/vhome/test_fed/certificates/federation/volttron2_ca.crt
    federation-user: volttron4.federation #<local instance name>.federation
  volttron5: # hostname of upstream server
    port: '5671'
    virtual-host: volttron5
    certificates:
        csr: true
        private_key: "path to private key"
        public_cert: "path to public cert"
        remote_ca: "path to CA cert"
    federation-user: volttron5.federation #<local instance name>.federation
To setup federation on the VOLTTRON instance, run the following command on the downstream server:
vcfg --rabbitmq federation [optional path to rabbitmq_federation_config.yml]
This establishes federation links to upstream servers. Once a federation link to the upstream server is established on the downstream server, the messages published on the upstream server become available to the downstream server as if it were published locally.
Multi-Platform RPC With Federation
For multi-platform RPC communication, federation links need to be established on both the VOLTTRON nodes. Once the federation links are established, RPC communication becomes fairly simple.
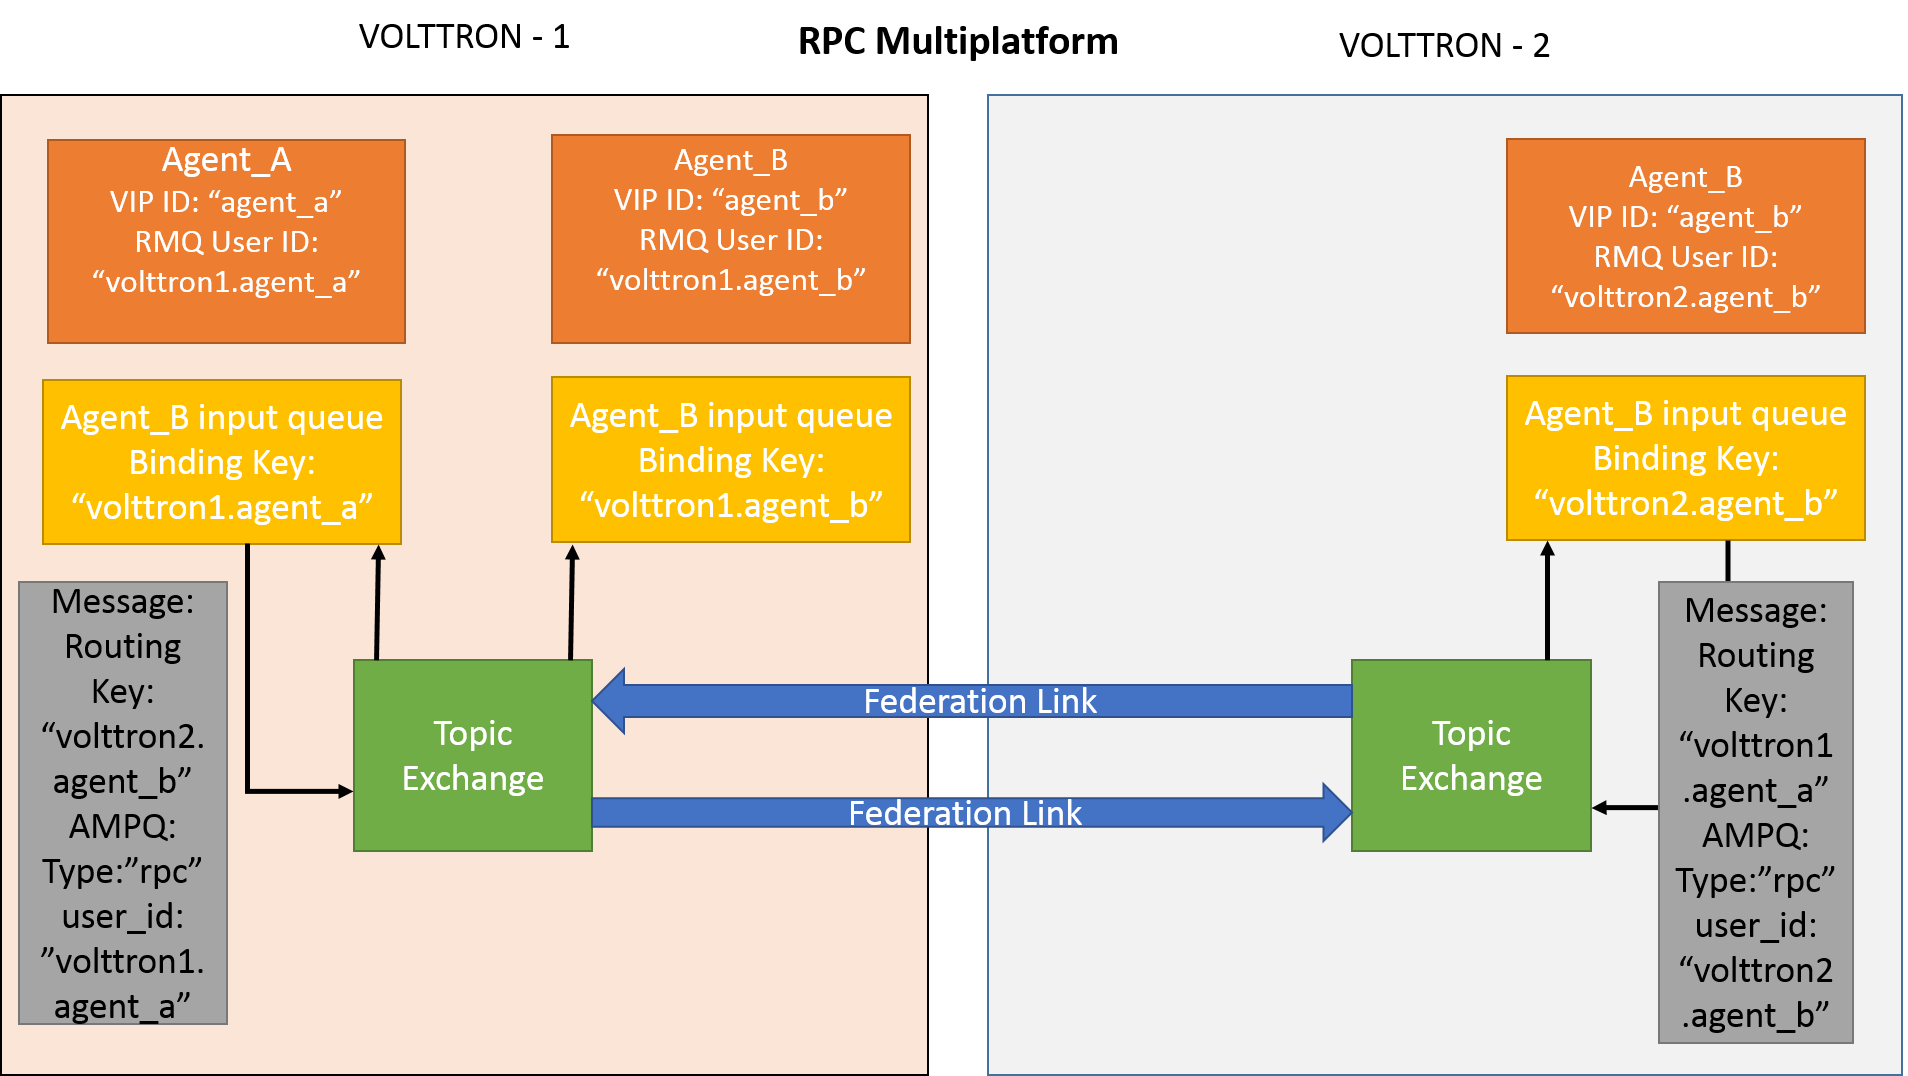
Consider Agent A on VOLTTRON instance “volttron1” on host “host_A” wants to make RPC call to Agent B on VOLTTRON instance “volttron2” on host “host_B”.
Agent A makes RPC call.
kwargs = {"external_platform": self.destination_instance_name}
agent_a.vip.rpc.call("agent_b", set_point, "point_name", 2.5, \**kwargs)
The message is transferred over federation link to VOLTTRON instance “volttron2” as both the exchanges are made federated.
The RPC subsystem of Agent B calls the actual RPC method and gets the result. It encapsulates the message result into a VIP message object and sends it back to Agent A on VOLTTRON instance “volttron1”.
The RPC subsystem on Agent A receives the message result and gives it to the Agent A application.
Multi-Platform PubSub With Federation
For multi-platform PubSub communication, it is sufficient to have a single federation link from the downstream server to the upstream server. In case of bi-directional data flow, two links have to established in both the directions.
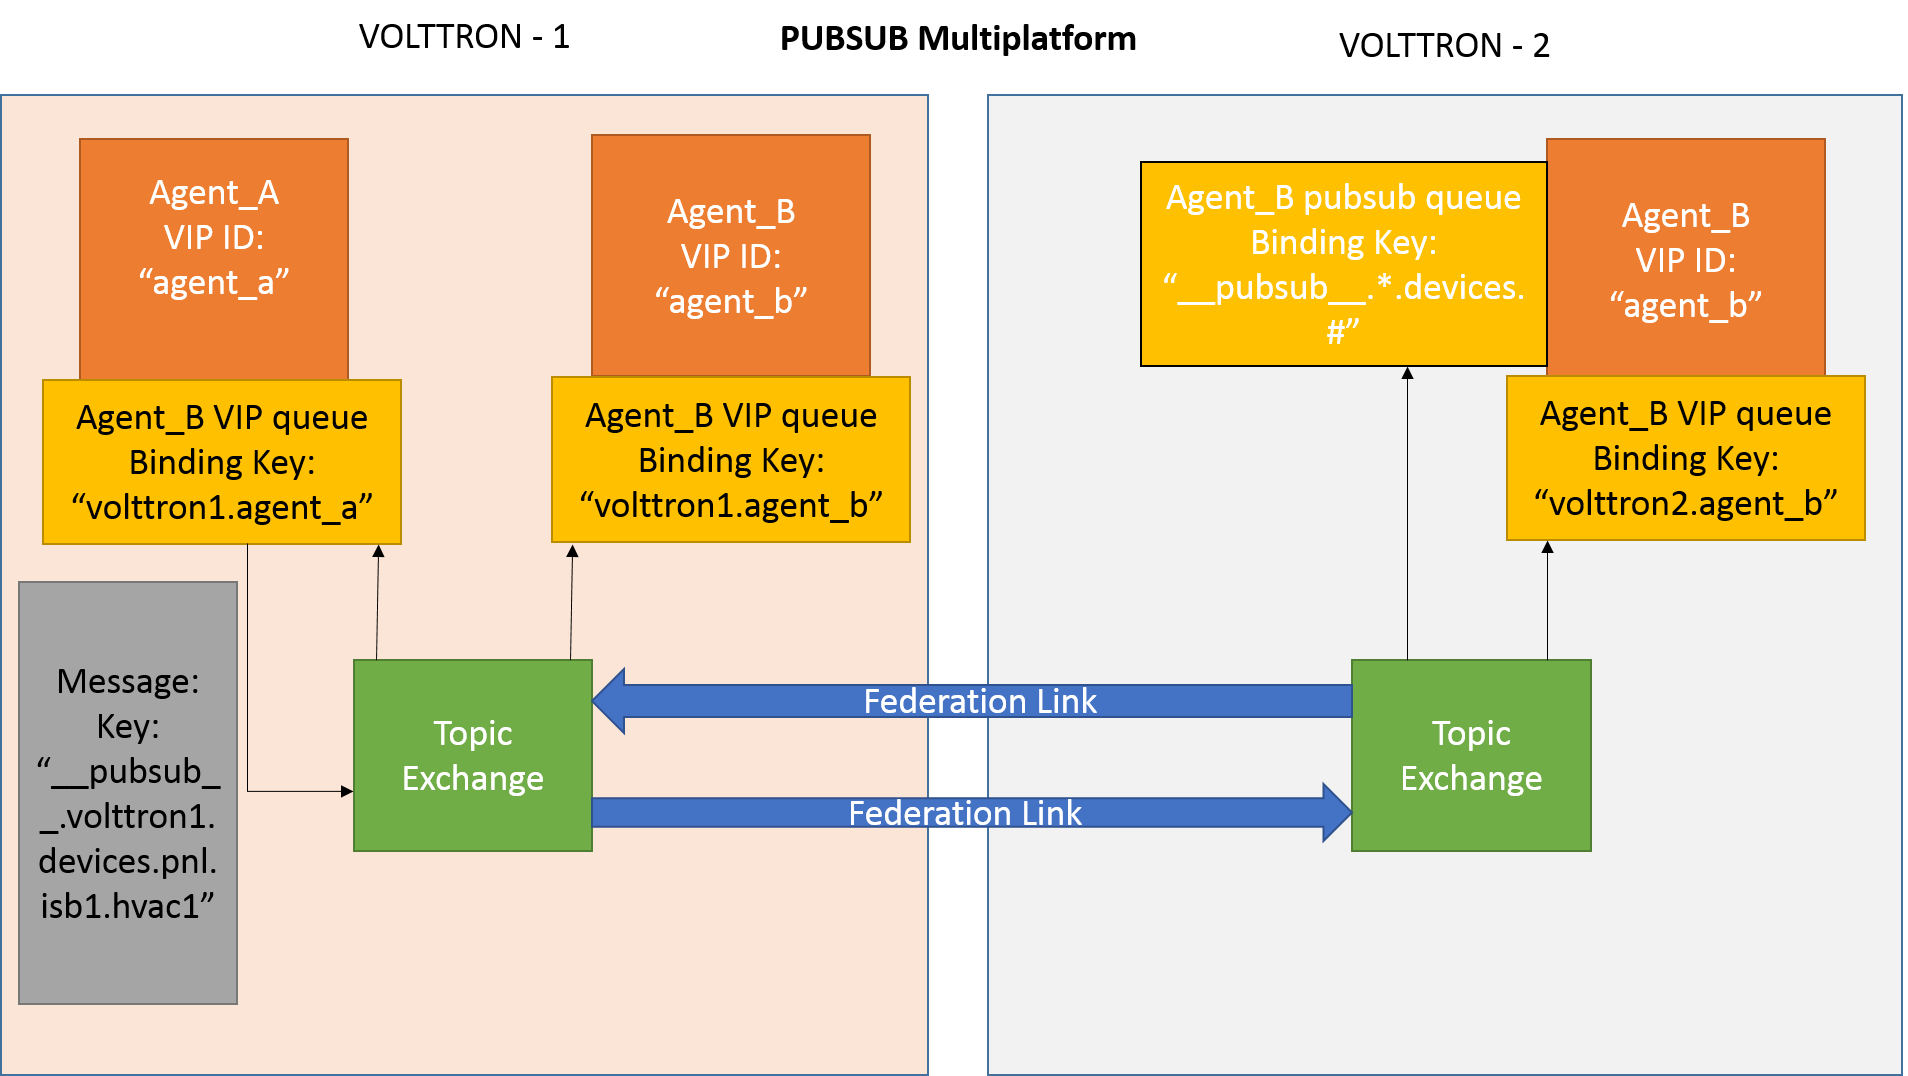
Consider Agent B on VOLTTRON instance “volttron2” on host “host_B” which wants to subscribe to messages from VOLTTRON instance “volttron2” on host “host_B”. First, a federation link needs to be established from “volttron2” to “volttron1”.
Agent B makes a subscribe call:
agent_b.vip.subscribe.call("pubsub", prefix="devices", all_platforms=True)
The PubSub subsystem converts the prefix to
__pubsub__.*.devices.#. Here,*indicates that agent is subscribing to thedevicestopic from all VOLTTRON platforms.A new queue is created and bound to VOLTTRON exchange with the above binding key. Since the VOLTTRON exchange is a federated exchange, any subscribed message on the upstream server becomes available on the federated exchange and Agent B will be able to receive it.
Agent A publishes message to topic devices/pnnl/isb1/hvac1
The PubSub subsystem publishes this message on its VOLTTRON exchange.
The message is received by the Pubsub subsystem of Agent A via the federation link.
Multi-Platform Federation Communication With RabbitMQ SSL
For multi-platform communication over federation, we need the connecting instances to trust each other.
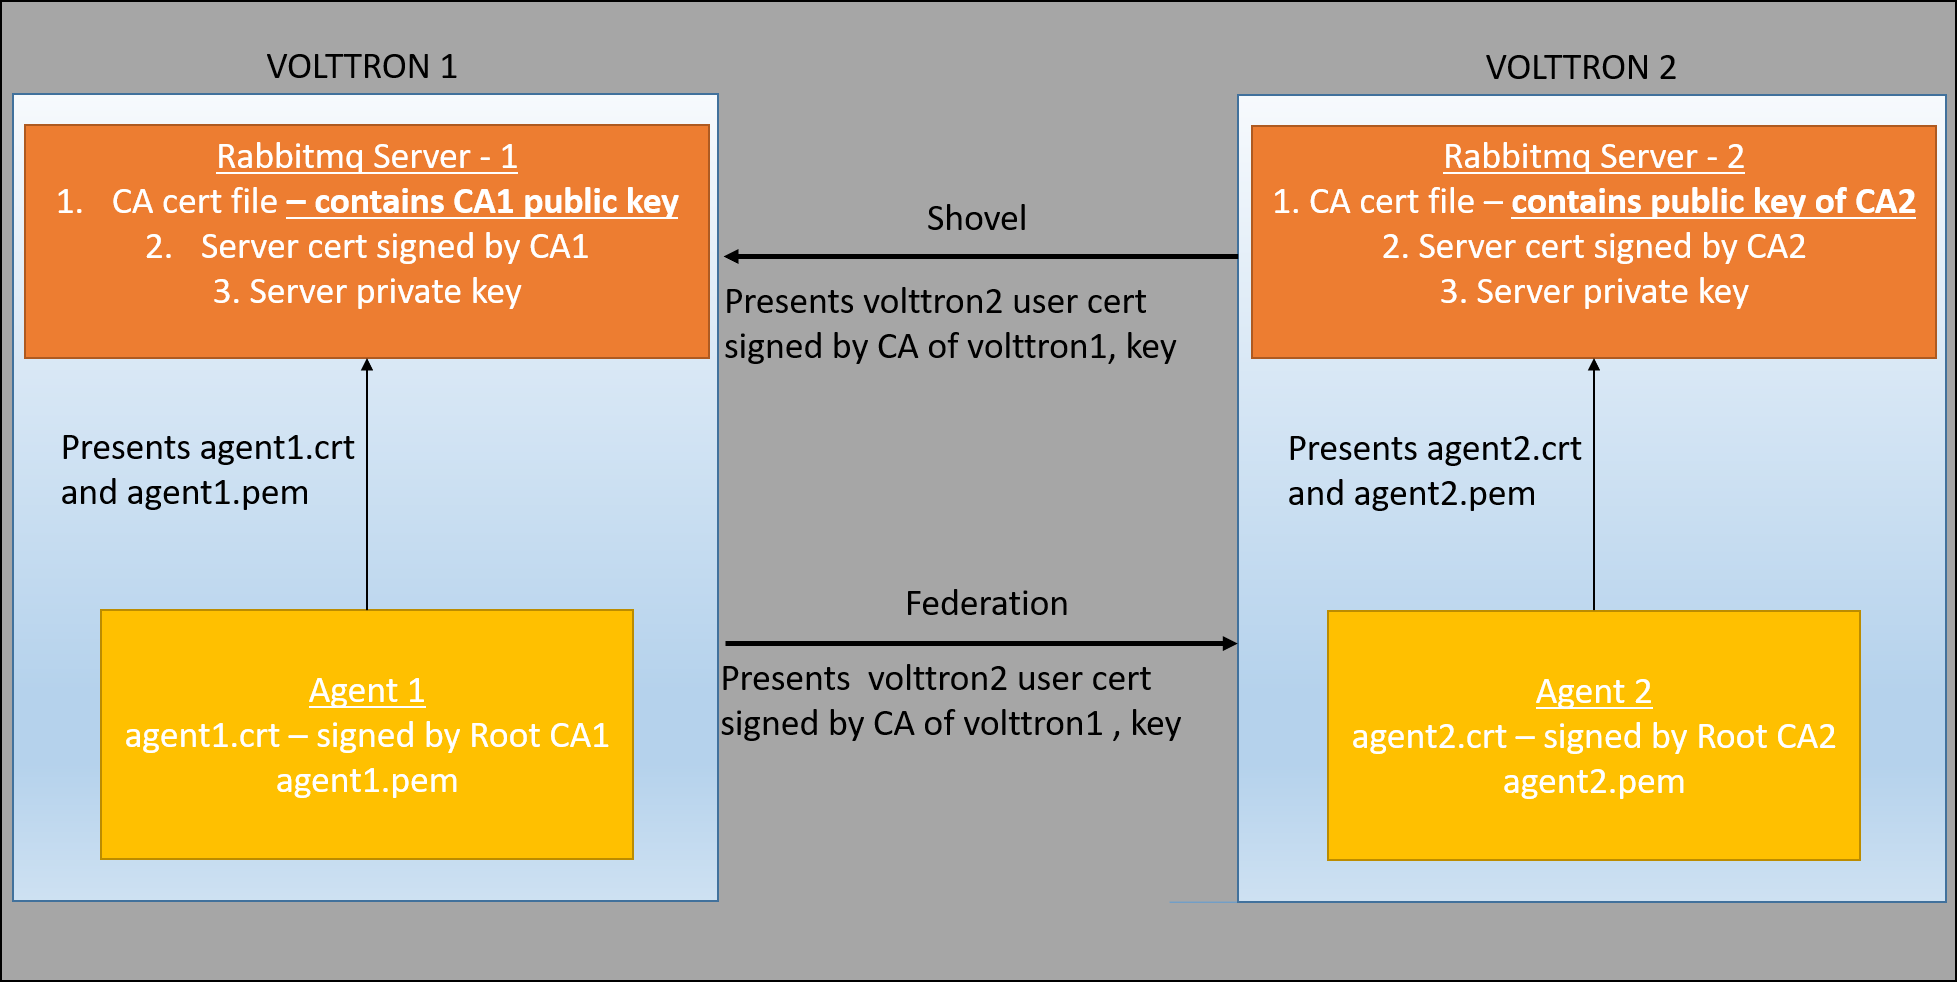
Suppose there are two virtual machines (VOLTTRON1 and VOLTTRON2) running single instances of RabbitMQ; VOLTTRON1 and VOLTTRON2 want to talk to each other via the federation or shovel plugins. For shovel/federation to have authenticated connection to the remote instance, it needs to have it’s public certificate signed by the remote instance’s CA. So as part of the shovel or federation creation steps, a certificate signing request is made to the remote instance. The admin of the remote instance should be ready to accept/reject such a request through VOLTTRON’s admin web interface. To facilitate this process, the VOLTTRON platform exposes a web-based server API for requesting, listing, approving, and denying certificate requests. For more detailed description, refer to Agent communication to Remote RabbitMQ instance. After the CSR request is accepted, an authenticated shovel/federation connection can be established.
Installation Steps
1. Setup two VOLTTRON instances using the instructions at platform installation steps for RMQ. Please note that each instance should have a unique instance name and should be running on a machine/VM that has a unique host name.
2. Identify upstream servers (publisher nodes) and downstream servers (collector nodes). To create a RabbitMQ federation, we have to configure upstream servers on the downstream server and make the VOLTTRON exchange “federated”.
On the downstream server (collector node)
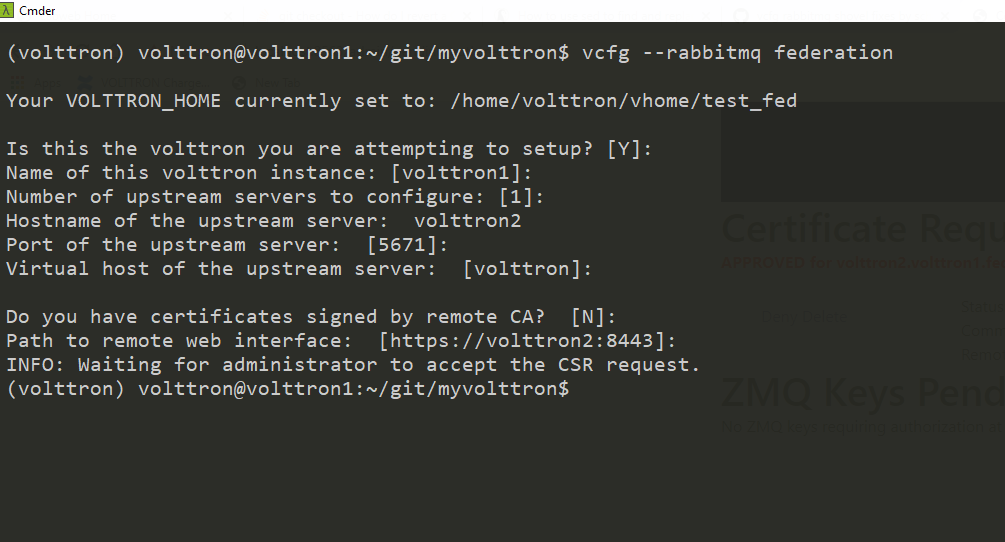
vcfg --rabbitmq federation [optional path to rabbitmq_federation_config.yml
containing the details of the upstream hostname, port and vhost.]
Example configuration for federation is available in examples/configurations/rabbitmq/rabbitmq_federation_config.yml
If no config file is provided, the script will prompt for hostname (or IP address), port, and vhost of each upstream node you would like to add and certificates for connecting to upstream server. For bi-directional data flow, we will have to run the same script on both the nodes.
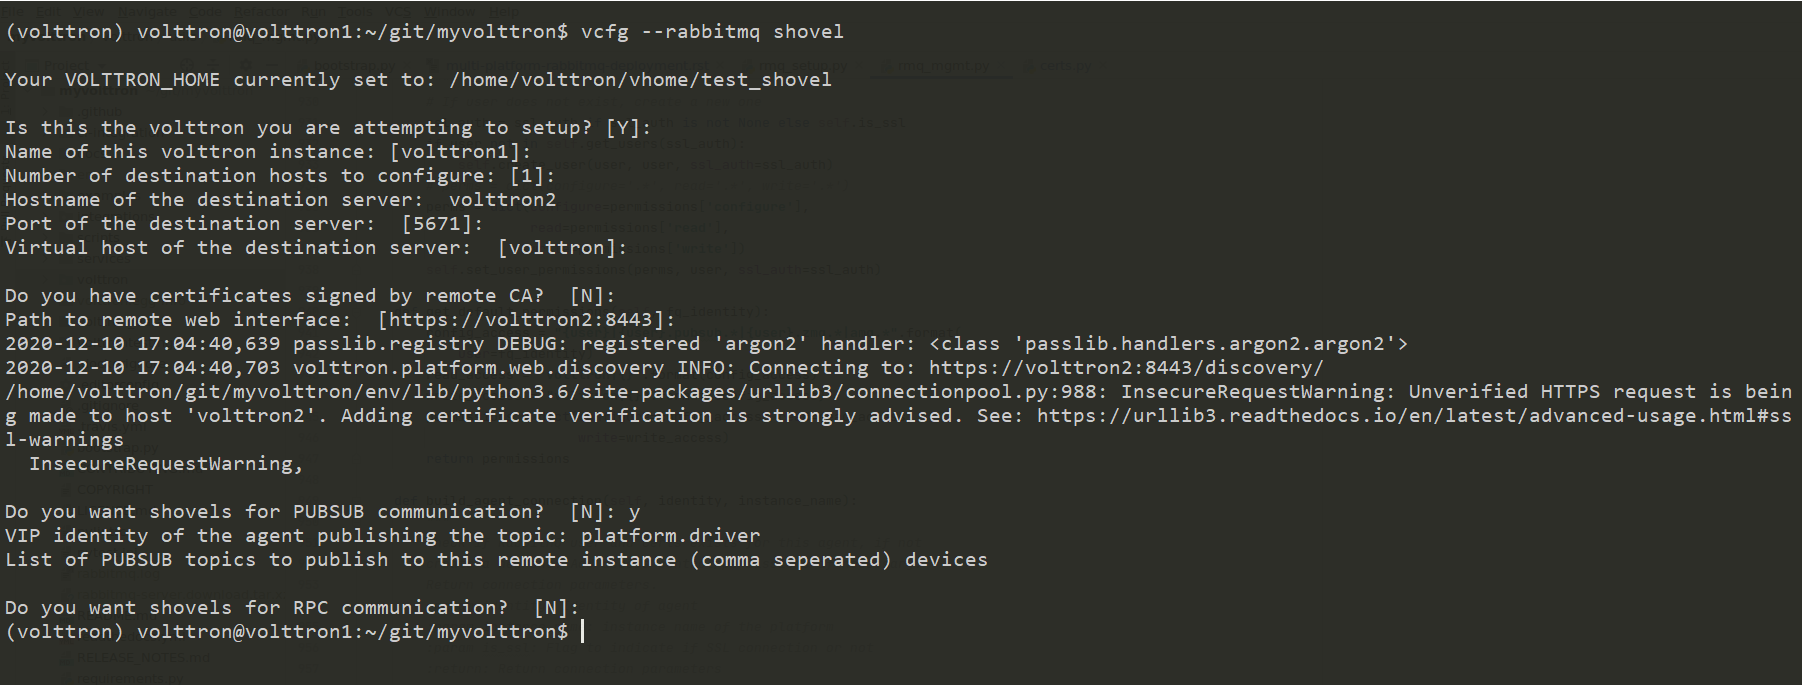
If no config file is provided and certificates for connecting to upstream server have to be generated afresh, then the upstream server should be web enabled and admin should be ready to accept/reject incoming requests. Please refer to Multiple Platform Multiple Bus connection on how to enable web feature and accept/reject incoming authentication requests. Below image shows steps to follow to create a federation link from downstream instance “volttron1” to upstream instance “volttron2”.
On downstream server (collector node),
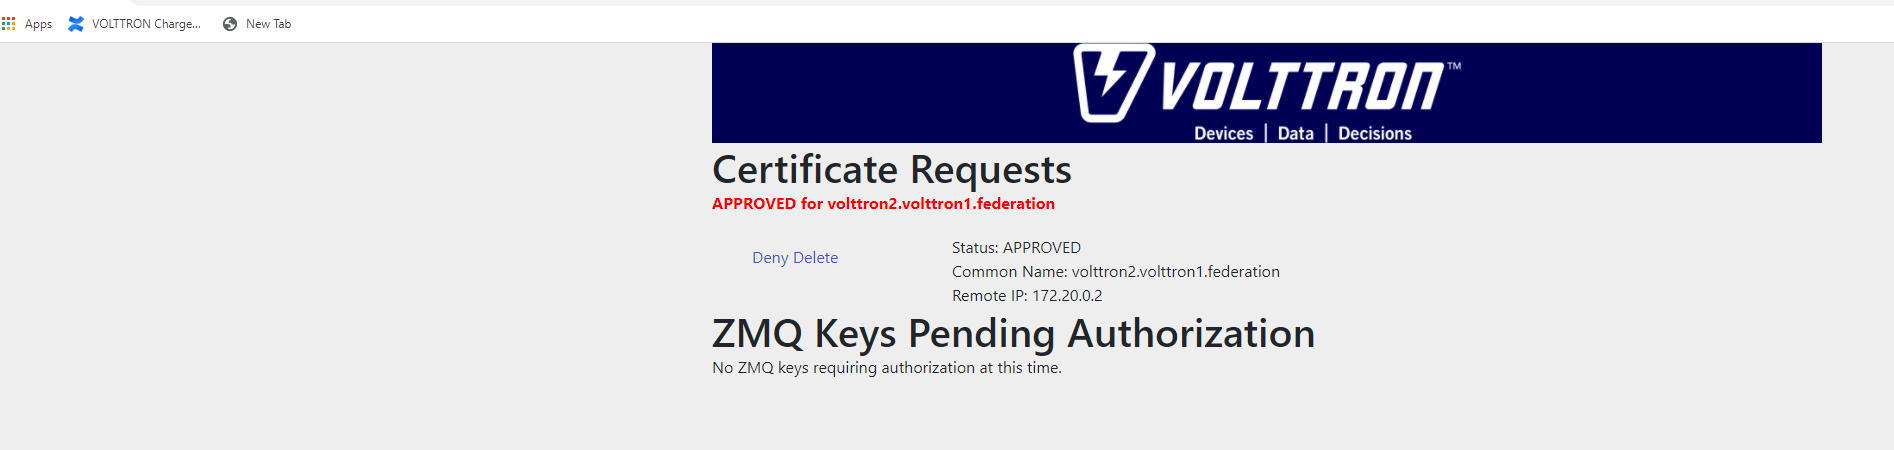
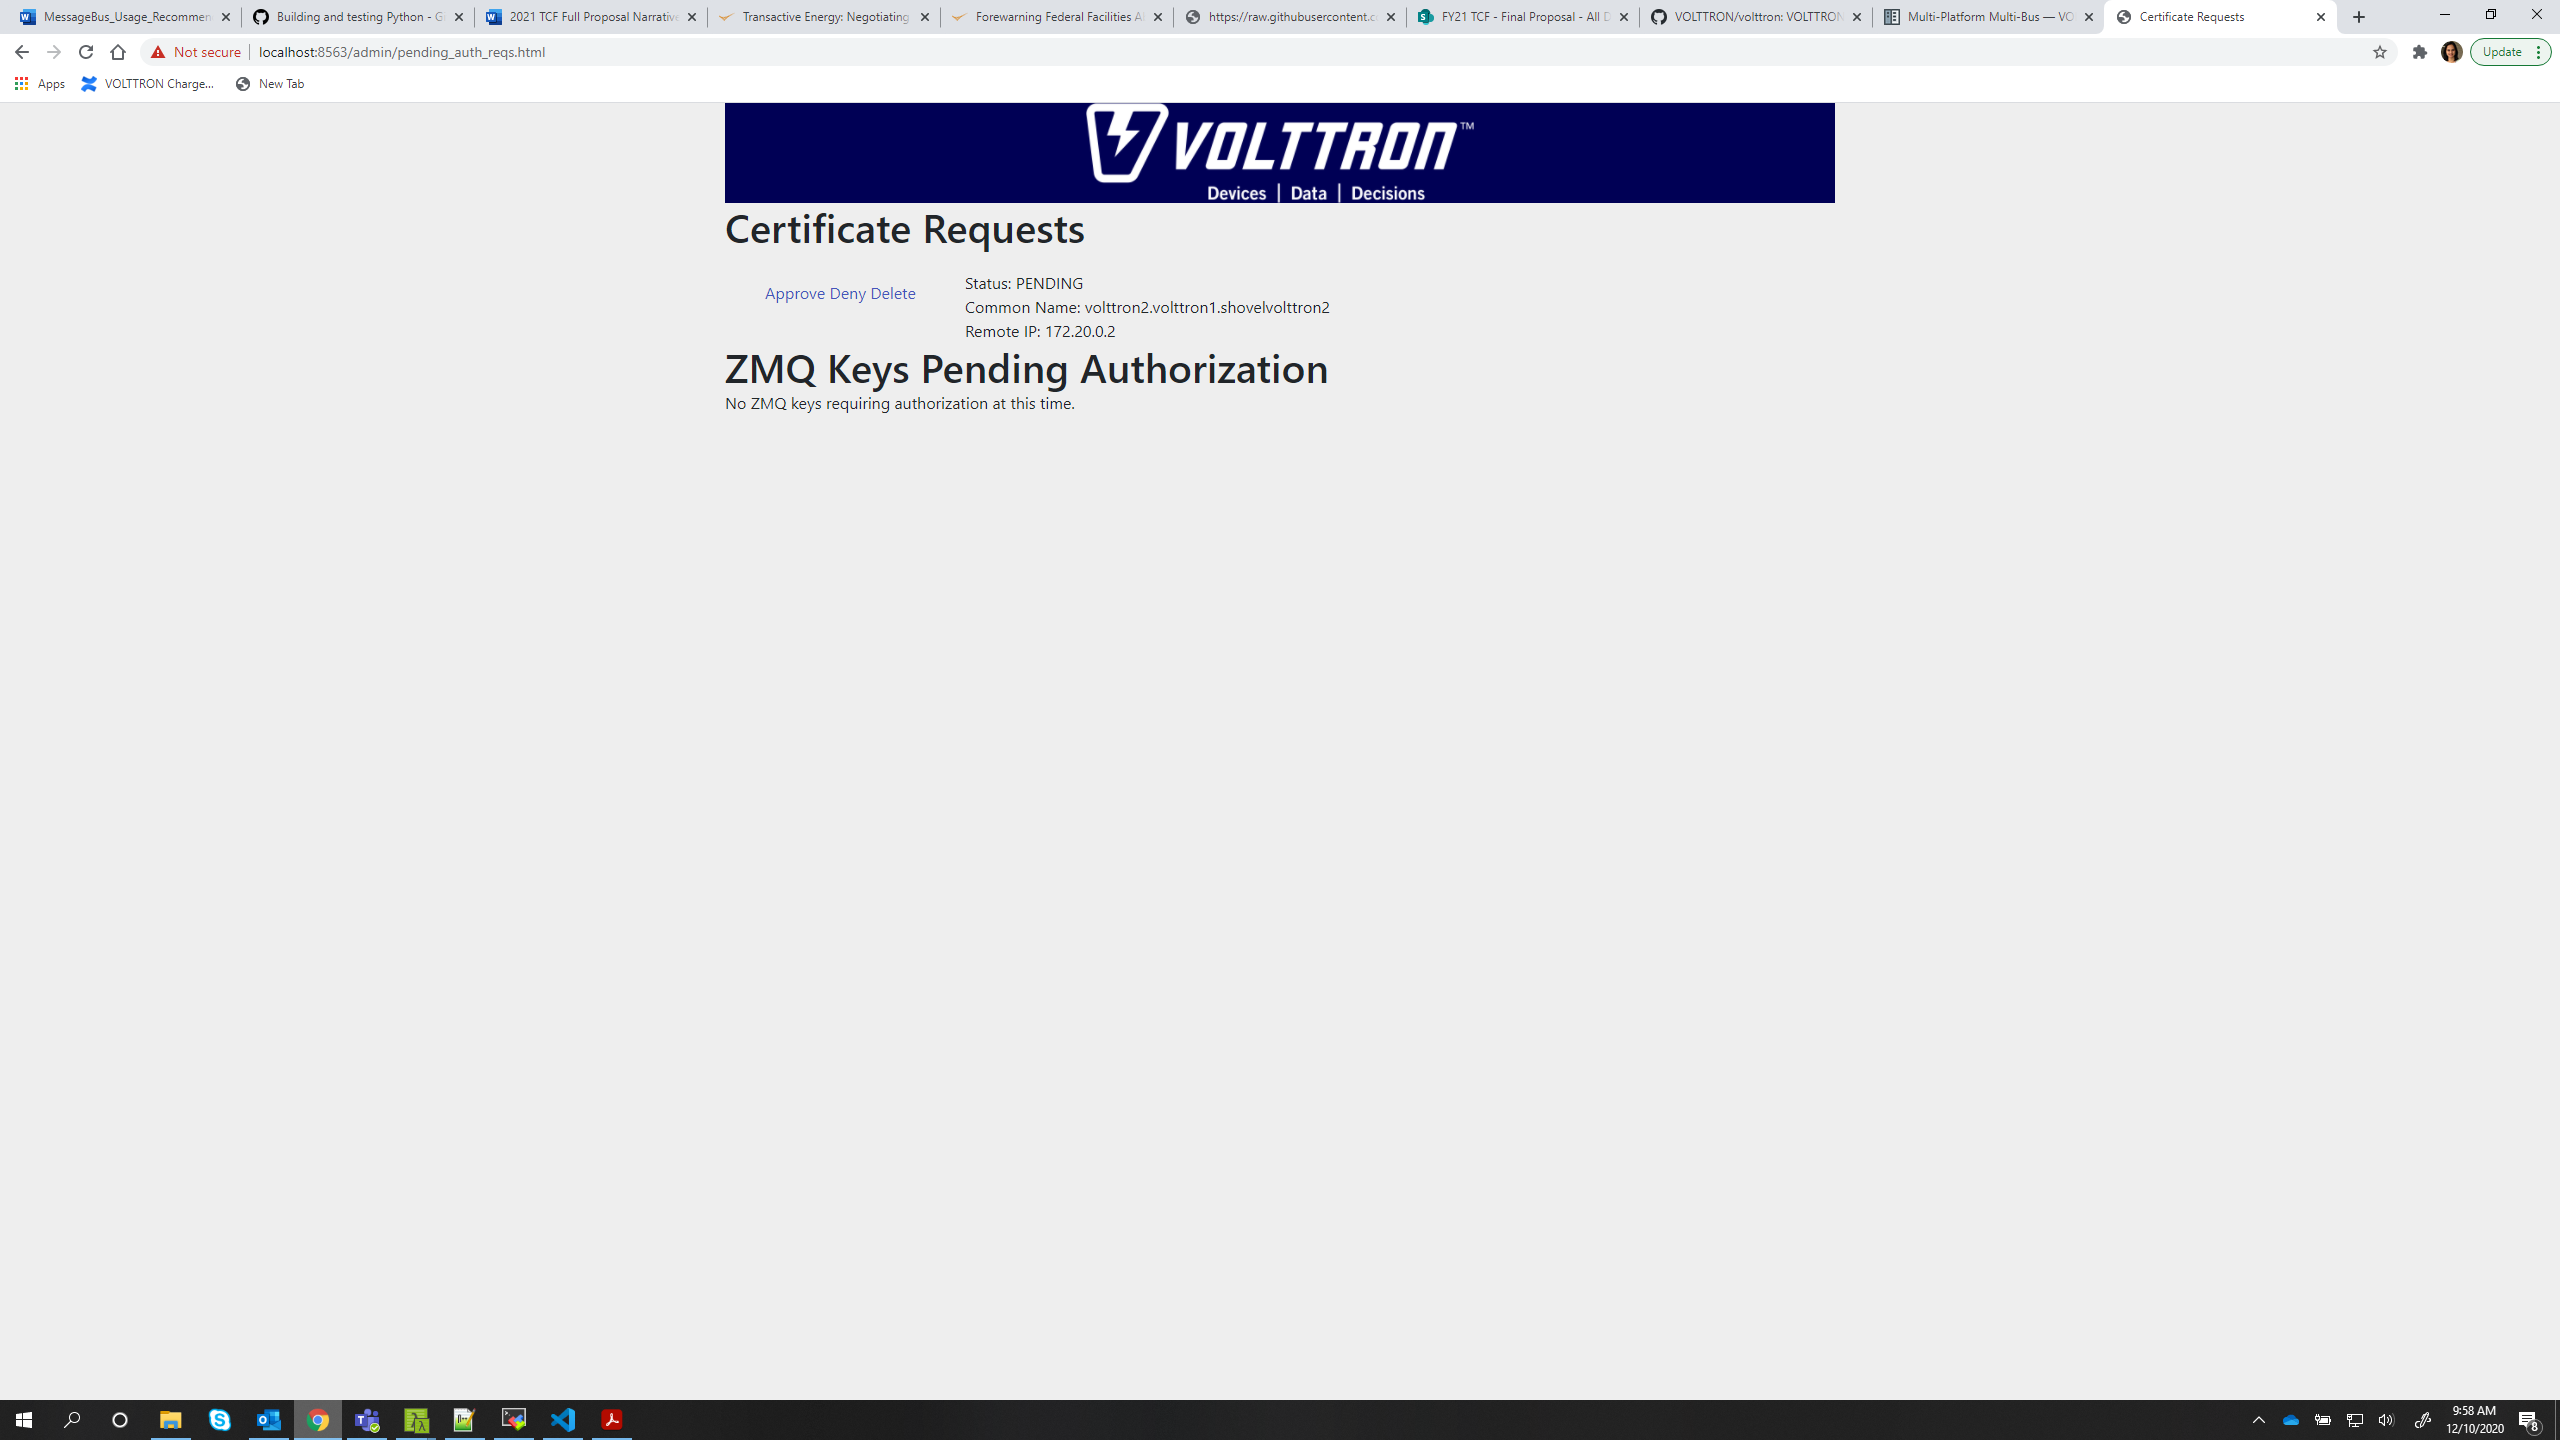
On upstream server (publisher node), Login to “https://volttron2:8443/index.html” in a web browser. You will see incoming CSR request from “volttron1” instance.
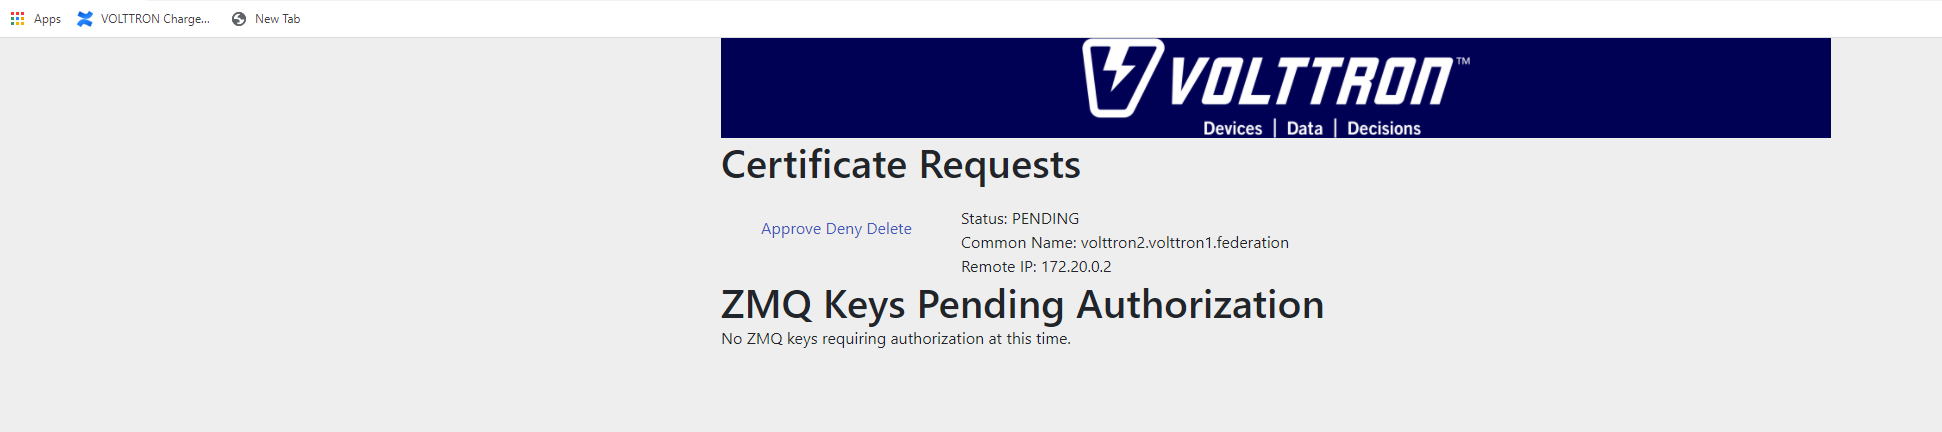
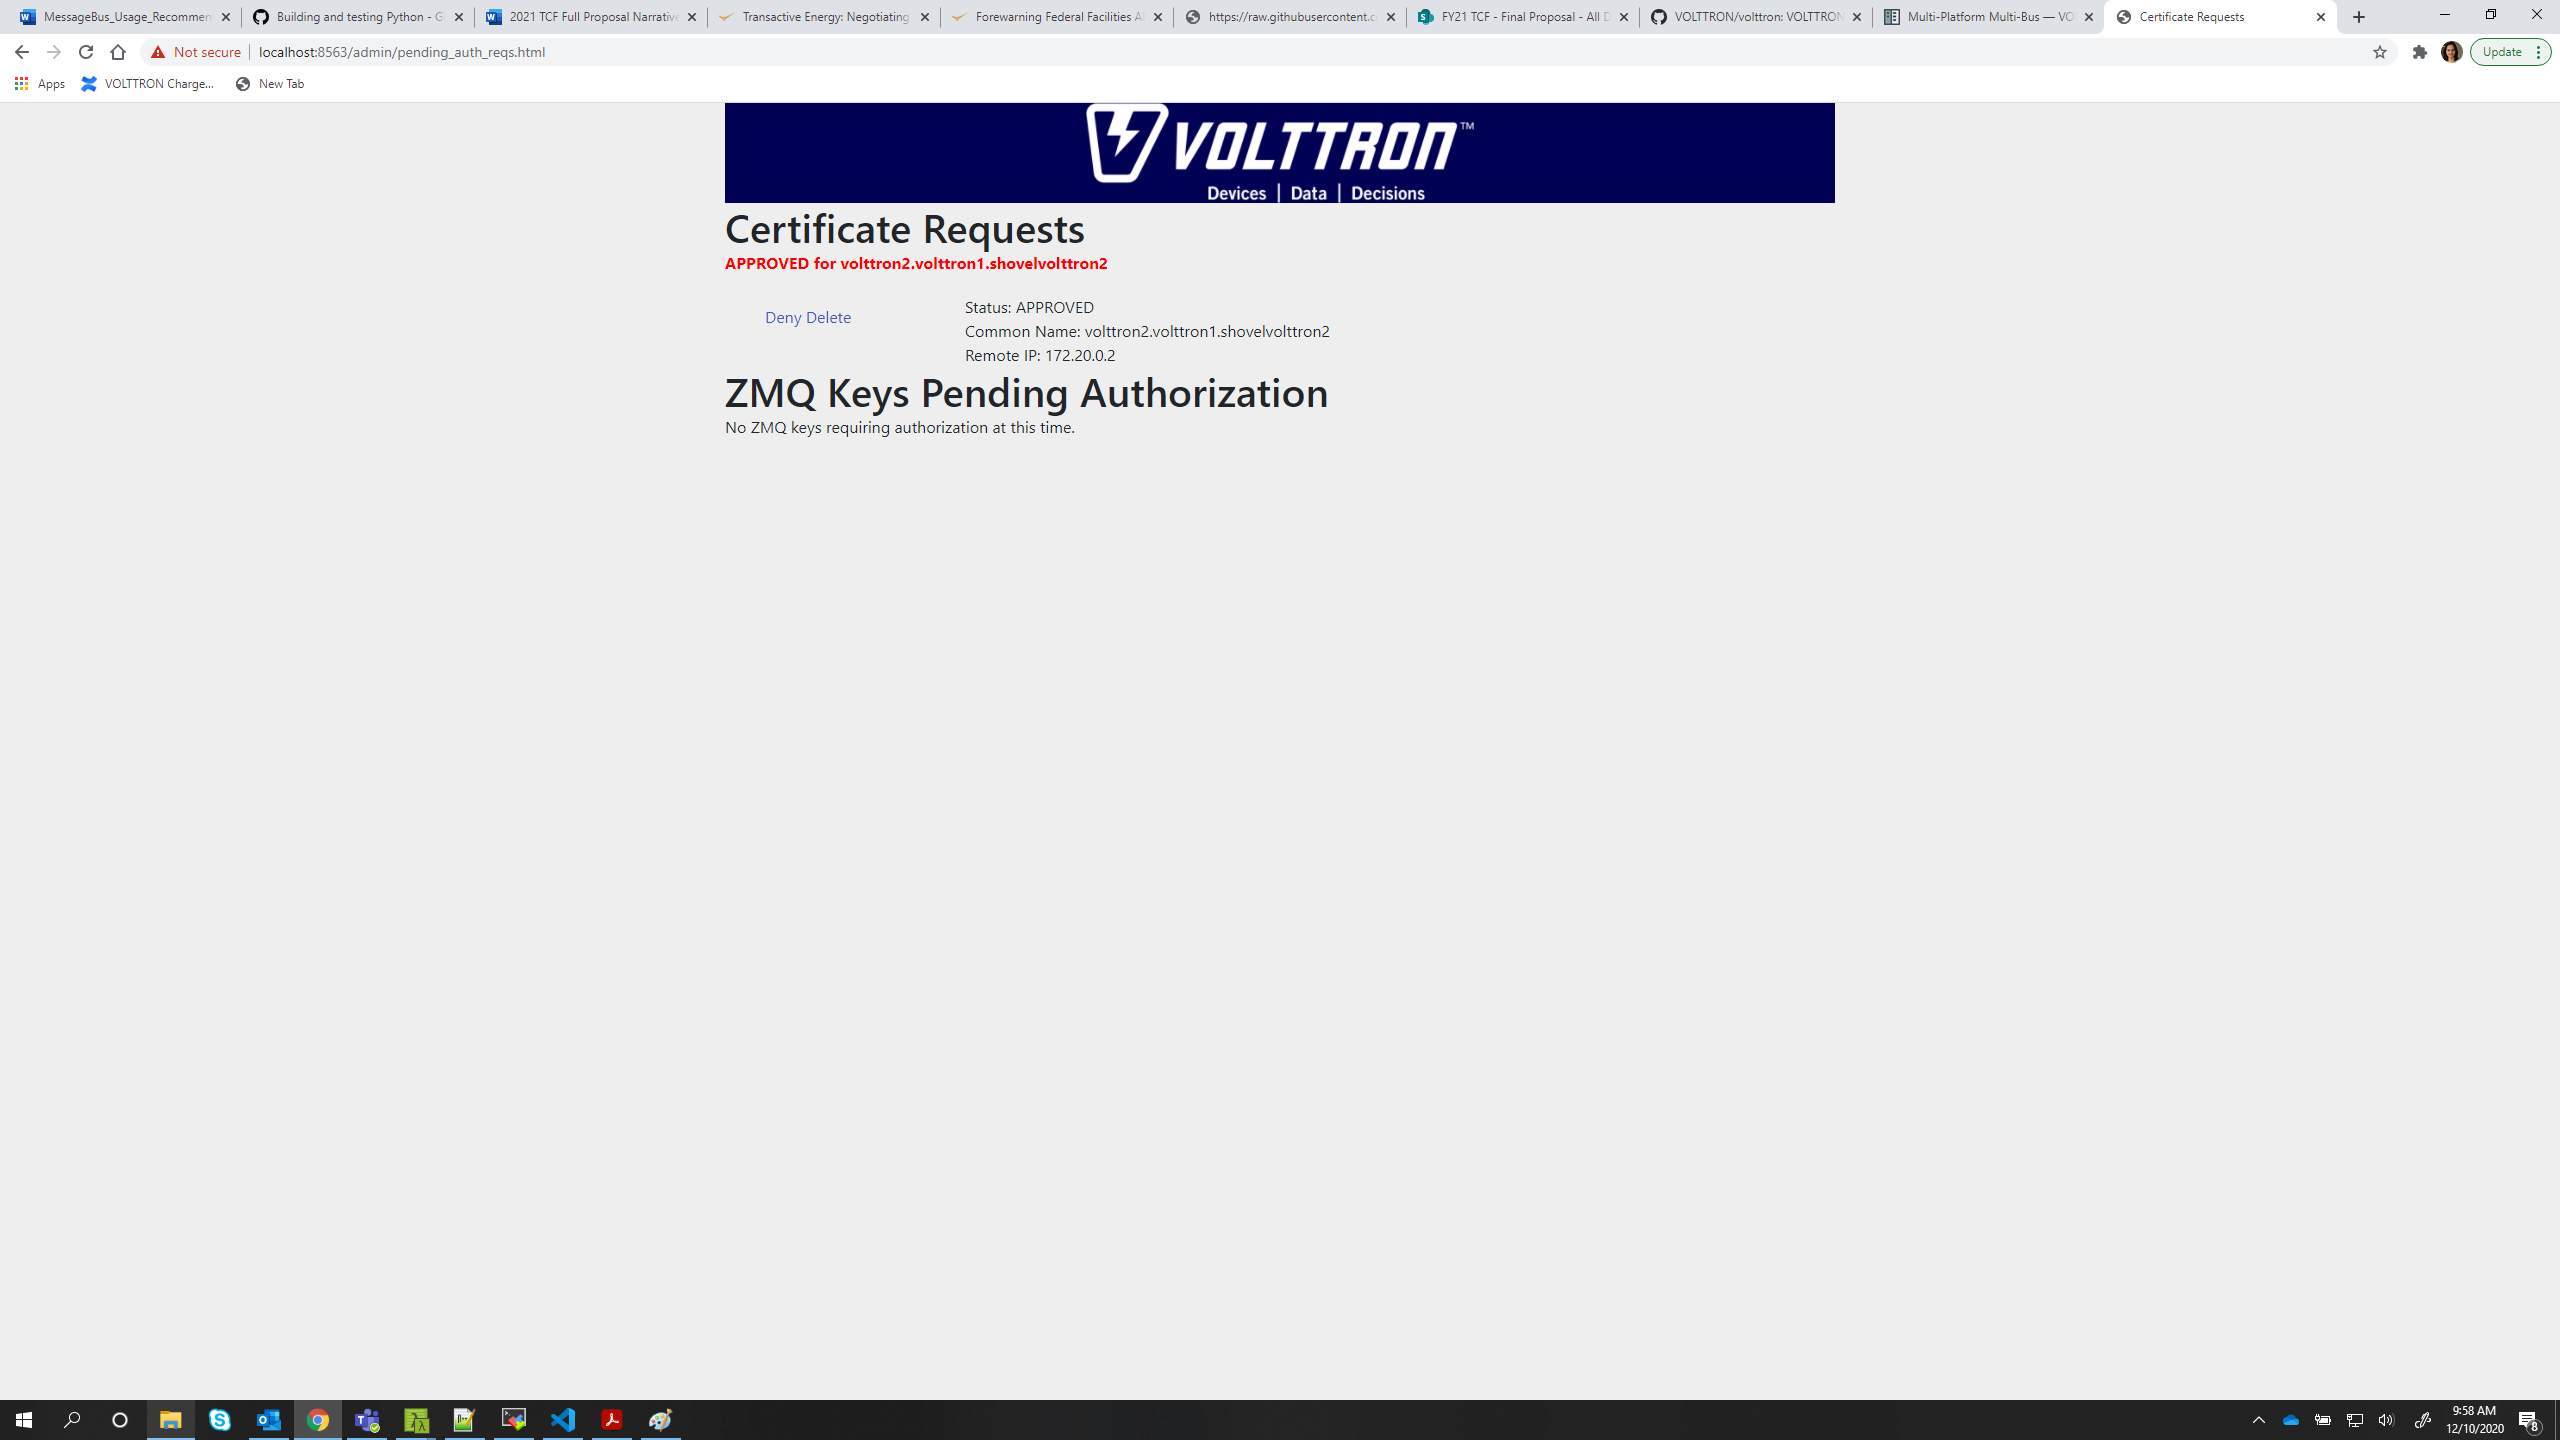
Accept the incoming CSR request from “volttron1” instance.
Create a user in the upstream server (publisher) and provide it access to the virtual host of the upstream RabbitMQ server. The username should take the form of <instance name of local><instance name of downstream>.federation. For example, if the downstream server name is “volttron1”, and instance of local instance is “volttron2” then the instance name would be “volttron2.volttron1.federation”. Run the below command in the upstream server
vctl rabbitmq add-user <username> <password>
Do you want to set READ permission  [Y/n]
Do you want to set WRITE permission  [Y/n]
Do you want to set CONFIGURE permission  [Y/n]
Test the federation setup.
On the downstream server run a listener agent which subscribes to messages from all platforms
vctl install examples/ListenerAgent --agent-config examples/ListenerAgent/config --startInstall platform driver, configure fake device on upstream server and start volttron and platform driver.
./stop-volttron
vcfg --agent platform_driver
./start-volttron
vctl start --tag platform_driver
Verify that the listener agent in downstream VOLTTRON instance is able to receive the messages. The downstream volttron instance’s volttron.log should display device data scrapped by platform driver agent in upstream volttron instance.
Open ports and https service if needed. On Redhat based systems, ports used by RabbitMQ (defaults to 5671, 15671 for SSL, 5672 and 15672 otherwise) might not be open by default. Please contact system administrator to get ports opened on the downstream server.
Following are commands used on centos 7.
sudo firewall-cmd --zone=public --add-port=15671/tcp --permanent
sudo firewall-cmd --zone=public --add-port=5671/tcp --permanent
sudo firewall-cmd --reload
How to remove federation link
Using the management web interface
Log into management web interface using downstream server’s admin username. Navigate to admin tab and then to federation management page. The status of the upstream link will be displayed on the page. Click on the upstream link name and delete it.
Using “vctl” command on the upstream server.
vctl rabbitmq list-federation-parameters
NAME                         URI
upstream-volttron2-volttron amqps://volttron2:5671/volttron?cacertfile=/home/volttron/vhome/test_fed/certificates/federation/volttron2_ca.crt&certfile=/home/volttron/vhome/test_fed/certificates/federation/volttron2.volttron1.federation.crt&keyfile=/home/volttron/vhome/test_fed/certificates/private/volttron1.federation.pem&verify=verify_peer&fail_if_no_peer_cert=true&auth_mechanism=external&server_name_indication=volttron2
Copy the upstream link name and run the below command to remove it.
vctl rabbitmq remove-federation-parameters upstream-volttron2-volttron
Note
These commands only remove the federation parameter from RabbitMQ and certificate entries from rabbitmq_federation_config.yml on the publisher node. It does not remove the actual certificates. Rerunning the federation command for same setup will reuse the existing certificates. If you need to rerun the federation command again for the same setup and need to create fresh certificates, then you will need to manually remove public and private certificates. Private certificates will be in $VOLTTRON_HOME/certificates/private. Public certificates will be in two directories: $VOLTTRON_HOME/certificates/federation and $VOLTTRON_HOME/certificates/certs. Further, you should request the remote instance admin to delete earlier generated certificates through admin web interface before a new CSR is sent for approval.
Using the Shovel Plugin
Shovels act as well-written client applications which move messages from a source to a destination broker. The below configuration shows how to setup a shovel to forward PubSub messages or perform multi-platform RPC communication from a local (i.e. publisher node) to a remote instance (i.e. subscriber node). The configuration expects hostname, port and virtual host values of the remote instance. It also needs certificates, namely private certs, public certificate signed by remote instance, and remote CA certificate.
Path: $VOLTTRON_HOME/rabbitmq_shovel_config.yml
# Mandatory parameters for shovel setup
shovel:
  rabbit-2:
    port: '5671'
    virtual-host: volttron
    certificates:
      csr: true
      private_cert: "path to private key" # For example, /home/volttron/vhome/test_shovel/certificates/private/volttron1.shovelvolttron2.pem
      public_cert: "path to public cert" # For example, /home/volttron/vhome/test_shovel/certificates/shovels/volttron2.volttron1.shovelvolttron2.crt
      remote_ca: "path to CA cert" # For example, /home/volttron/vhome/test_shovel/certificates/shovels/volttron2_ca.crt

    # Configuration to forward pubsub topics
    pubsub:
      # Identity of agent that is publishing the topic
      platform.driver:
        - devices
    # Configuration to make remote RPC calls
    rpc:
      # Remote instance name
      volttron2:
        # List of pair of agent identities (local caller, remote callee)
        - [scheduler, platform.actuator]
To forward PubSub messages, the topic and agent identity of the publisher agent is needed. To perform RPC, the instance name of the remote instance and agent identities of the local agent and remote agent are needed.
To configure the VOLTTRON instance to setup shovel, run the following command on the local instance.
vcfg --rabbitmq shovel [optional path to rabbitmq_shovel_config.yml]
This sets up a shovel that forwards messages (either PubSub or RPC) from a local exchange to a remote exchange.
Multi-Platform PubSub With Shovel
After the shovel link is established for Pubsub, the below figure shows how the communication happens.
Note
For bi-directional pubsub communication, shovel links need to be created on both the nodes. The “blue” arrows show the shovel binding key. The pubsub topic configuration in $VOLTTRON_HOME/rabbitmq_shovel_config.yml gets internally converted to the shovel binding key: “__pubsub__.<local instance name>.<actual topic>”.
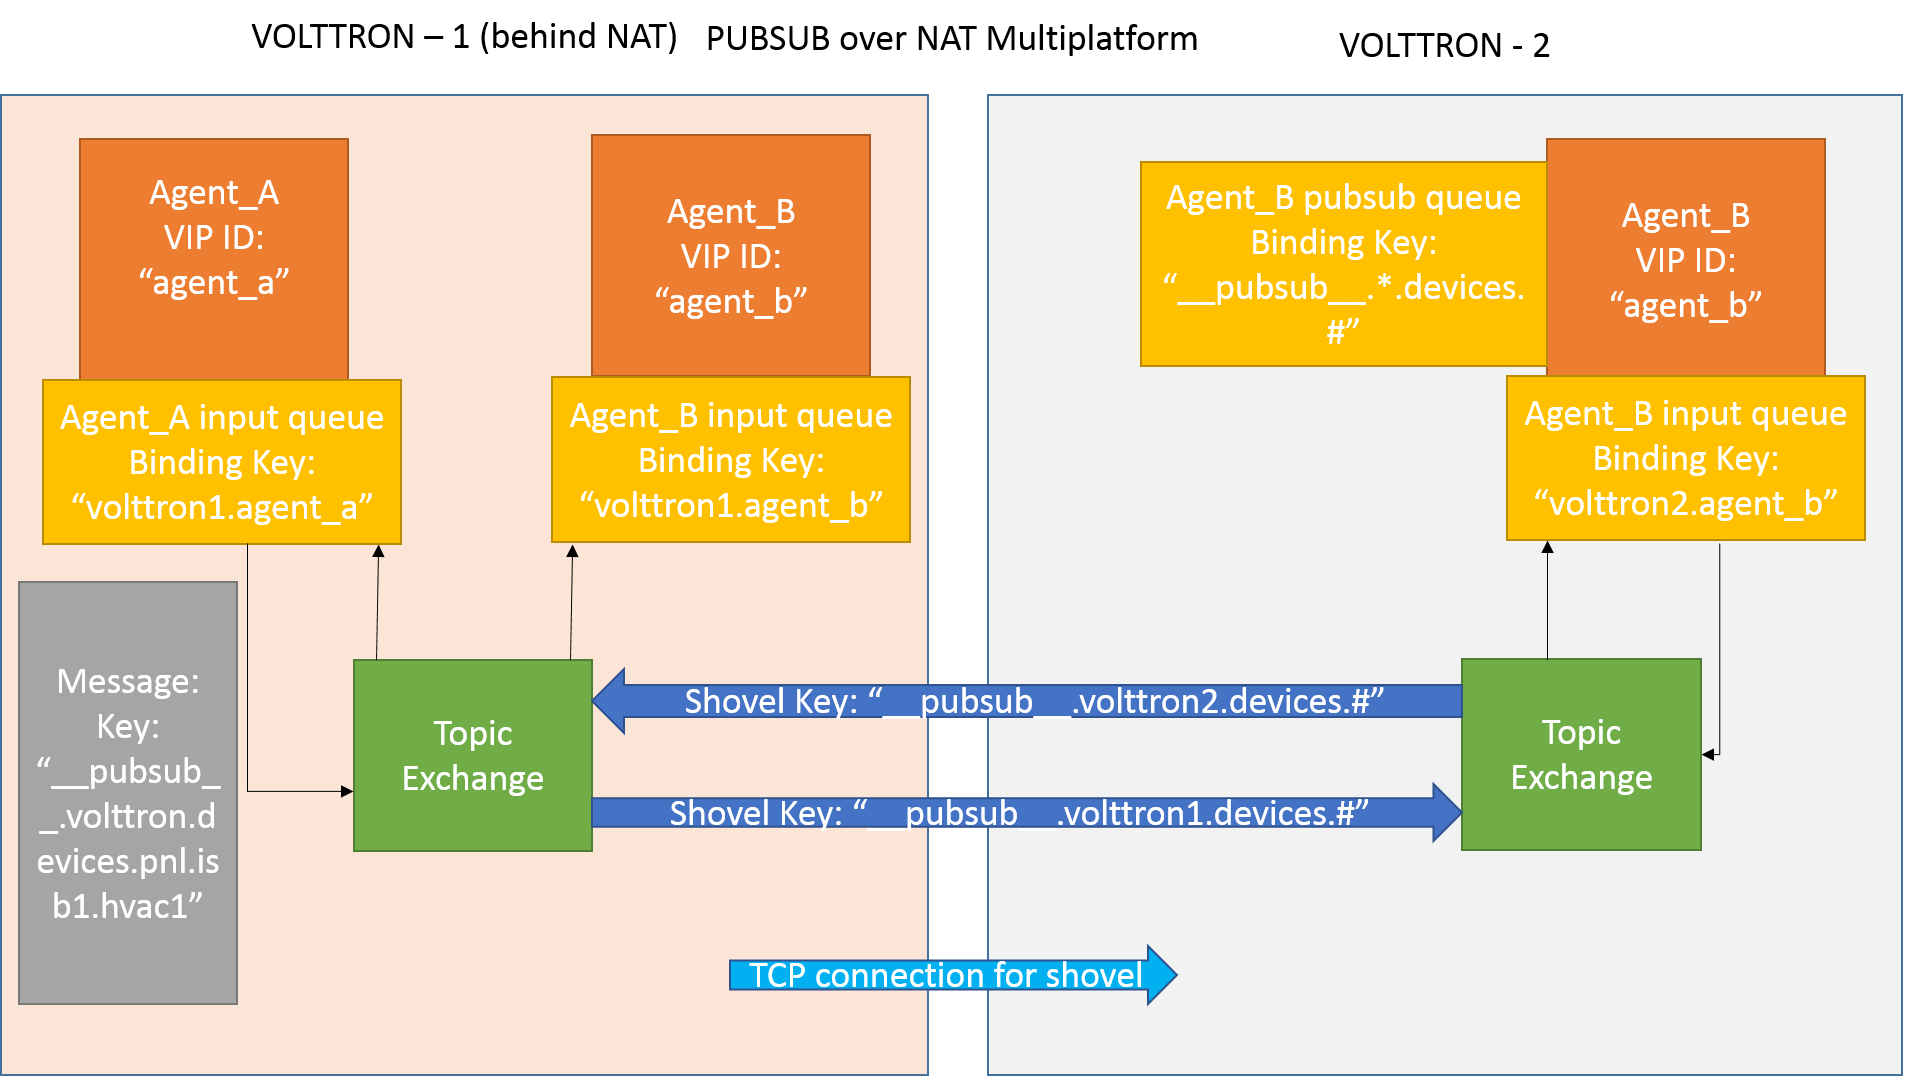
Now consider a case where shovels are setup in both the directions for forwarding “devices” topic.
Agent B makes a subscribe call to receive messages with topic “devices” from all connected platforms.
agent_b.vip.subscribe.call("pubsub", prefix="devices", all_platforms=True)
The PubSub subsystem converts the prefix to
__pubsub__.*.devices.#The*indicates that the agent is subscribing to the “devices” topic from all the VOLTTRON platforms.A new queue is created and bound to VOLTTRON exchange with above binding key.
Agent A publishes message to topic devices/pnnl/isb1/hvac1
PubSub subsystem publishes this message on its VOLTTRON exchange.
Because of the shovel link from VOLTTRON instance “volttron1” to “volttron2”, the message is forwarded from VOLTTRON exchange “volttron1” to “volttron2” and is picked up by Agent B on “volttron2”.
Multi-Platform RPC With Shovel
After the shovel link is established for multi-platform RPC, the below figure shows how the RPC communication happens.
Note
It is mandatory to have shovel links in both directions because RPC is a request-response type of communication. We will need to set the agent identities for caller and callee in the $VOLTTRON_HOME/rabbitmq_shovel_config.yml. The “blue” arrows show the resulting the shovel binding key.
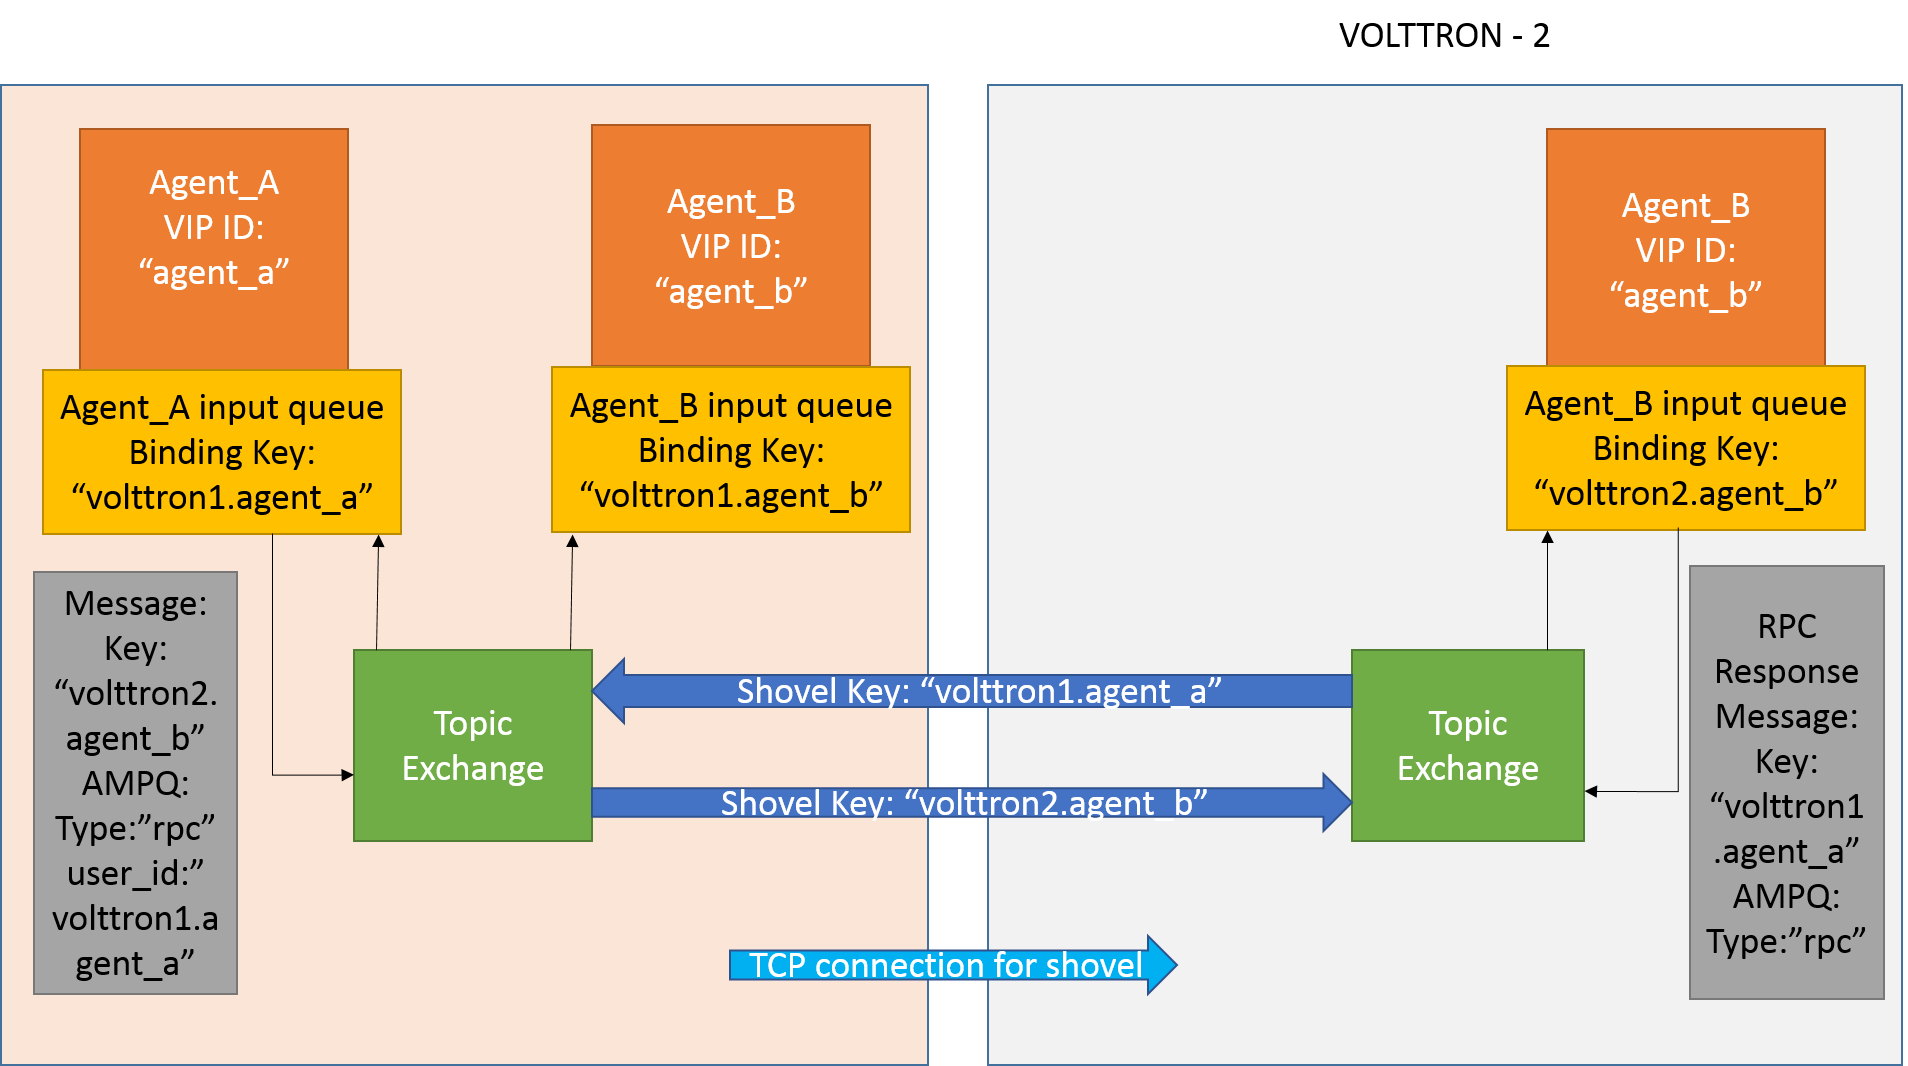
Consider Agent A on VOLTTRON instance “volttron1” on host “host_A” wants to make RPC call on Agent B on VOLTTRON instance “volttron2” on host “host_B”.
Agent A makes RPC call:
kwargs = {"external_platform": self.destination_instance_name}
agent_a.vip.rpc.call("agent_b", set_point, "point_name", 2.5, \**kwargs)
The message is transferred over shovel link to VOLTTRON instance “volttron2”.
The RPC subsystem of Agent B calls the actual RPC method and gets the result. It encapsulates the message result into a VIP message object and sends it back to Agent A on VOLTTRON instance “volttron1”.
The RPC subsystem on Agent A receives the message result and gives it to Agent A’s application.
Installation Steps for Pubsub Communication
For multi-platform communication over shovel, we need the connecting instances to trust each other. As part of the shovel
creation process, a certificate signing request is made to the remote instance. The admin of the remote instance has to
accept or reject such a request through VOLTTRON admin web interface. If accepted, a bundle containing a certificate
signed by the remote CA is sent as a response back to the local instance. Subsequently, shovel connection is
established with these certificates. If the user already has certificates signed by the remote CA, then that will be used for
connection. Otherwise, the user can run the command vcfg --rabbitmq shovel and it will prompt the user to make a CSR request as part of shovel setup.
1. Setup two VOLTTRON instances using the steps described in installation section. Please note that each instance should have a unique instance name.
Identify the instance that is going to act as the “publisher” instance. Suppose “volttron1” instance is the “publisher” instance and “volttron2” instance is the “subscriber” instance. Then we need to create a shovel on “volttron1” to forward messages matching certain topics to remote instance “volttron2”.
On the publisher node,
vcfg --rabbitmq shovel [optional path to rabbitmq_shovel_config.yml]
rabbitmq_shovel_config.yml should contain the details of the remote hostname, port, vhost, certificates for connecting to remote instance and list of topics to forward. Example configuration for shovel is available in examples/configurations/rabbitmq/rabbitmq_shovel_config.yml
For this example, let’s set the topic to “devices”
If no config file is provided, the script will prompt for hostname (or IP address), port, vhost, certificates for connecting to remote instance and list of topics for each remote instance you would like to add. For bi-directional data flow, we will have to run the same script on both the nodes.
b. If no config file is provided and certificates for connecting to remote instance have to be generated afresh, then the remote instance should be web enabled and admin should be ready to accept/reject incoming requests. Please refer to Multiple Platform Multiple Bus connection on how to enable web feature and accept/reject incoming authentication requests. Below image shows steps to follow to create a shovel to connect from “volttron1” to “volttron2” to publish “devices” topic from “volttron1” to “volttron2”.
On publisher node,
On subscriber node, login to “https://volttron2:8443/index.html” in a web browser. You will see an incoming CSR request from “volttron1” instance.
Accept the incoming CSR request from “volttron1” instance.
Create a user in the subscriber node with username set to the publisher instance’s agent name (for example: volttron1-admin) and allow the shovel access to the virtual host of the subscriber node.
cd $RABBITMQ_HOME
vctl rabbitmq add-user <username> <password>
Test the shovel setup.
Start VOLTTRON on publisher and subscriber nodes.
On the publisher node, install and start a platform driver agent that publishes messages related to a fake device.
./stop-volttron
vcfg --agent platform_driver
./start-volttron
vctl start --tag platform_driver
On the subscriber node, run a listener agent which subscribes to messages from all platforms.
Open the file examples/ListenerAgent/listener/agent.py. Search for
@PubSub.subscribe('pubsub', '')and replace that line with@PubSub.subscribe('pubsub', 'devices', all_platforms=True)Install the listener
vctl install examples/ListenerAgent --agent-config examples/ListenerAgent/config --start
Verify listener agent in downstream VOLTTRON instance can receive the messages. The downstream volttron instance’s volttron.log should display device data scrapped by the platform driver agent in the upstream volttron instance.
How to remove the shovel setup.
On the subscriber node, remove the shovel on using the management web interface
Log into management web interface using publisher instance’s admin username. Navigate to admin tab and then to shovel management page. The status of the shovel will be displayed on the page. Click on the shovel name and delete the shovel.
On the publisher node, run the following “vctl” commands:
vctl rabbitmq list-shovel-parameters
NAME                     SOURCE ADDRESS                                                 DESTINATION ADDRESS                                            BINDING KEY
shovel-volttron2-devices  amqps://volttron1:5671/volttron?cacertfile=/home/volttron/vhome/test_shovel/certificates/certs/volttron1-trusted-cas.crt&certfile=/home/volttron/vhome/test_shovel/certificates/certs/volttron1.platform.driver.crt&keyfile=/home/volttron/vhome/test_shovel/certificates/private/volttron1.platform.driver.pem&verify=verify_peer&fail_if_no_peer_cert=true&auth_mechanism=external&server_name_indication=volttron1  amqps://volttron2:5671/volttron?cacertfile=/home/volttron/vhome/test_shovel/certificates/shovels/volttron2_ca.crt&certfile=/home/volttron/vhome/test_shovel/certificates/shovels/volttron2.volttron1.shovelvolttron2.crt&keyfile=/home/volttron/vhome/test_shovel/certificates/private/volttron1.shovelvolttron2.pem&verify=verify_peer&fail_if_no_peer_cert=true&auth_mechanism=external&server_name_indication=volttron2  __pubsub__.volttron1.devices.#
Copy the shovel name and run following command to remove it.
vctl rabbitmq remove-shovel-parameters shovel-volttron2-devices
Note
These commands only remove the shovel parameter from RabbitMQ and certificate entries from rabbitmq_shovel_config.yml on the publisher node. It does not remove the actual certificates. Rerunning the shovel command for same setup will reuse the existing certificates. But if you need to rerun the shovel command again for the same setup and need to create fresh certificates, then you will need to manually remove public and private certificates. Private certificates will be in $VOLTTRON_HOME/certificates/private. Public certificates will be in two directories: $VOLTTRON_HOME/certificates/shovel and $VOLTTRON_HOME/certificates/certs. Further, you should request the remote instance admin to delete earlier generated cert through the admin web interface before a new CSR is sent for approval.
DataMover Communication
The DataMover historian running on one instance makes RPC call to platform historian running on remote instance to store data on remote instance. Platform historian agent returns response back to DataMover agent. For such a request-response behavior, shovels need to be created on both instances.
Please ensure that preliminary steps for multi-platform communication are completed (namely, steps 1-3 described above) .
To setup a data mover to send messages from local instance (say v1) to remote instance (say v2) and back, we would need to setup shovels on both instances.
Example of RabbitMQ shovel configuration on v1
shovel:
# hostname of remote machine
 rabbit-2:
  port: 5671
  certificates:
    csr: true
    private_cert: "path to private key" # For example, /home/volttron/vhome/test_shovel/certificates/private/volttron1.shovelvolttron2.pem
    public_cert: "path to public cert" # For example, /home/volttron/vhome/test_shovel/certificates/shovels/volttron2.volttron1.shovelvolttron2.crt
    remote_ca: "path to CA cert" # For example, /home/volttron/vhome/test_shovel/certificates/shovels/volttron2_ca.crt
  rpc:
    # Remote instance name
    v2:
    # List of pair of agent identities (local caller, remote callee)
    - [data.mover, platform.historian]
  virtual-host: v1
This says that DataMover agent on v1 wants to make RPC call to platform historian on v2.
 vcfg --rabbitmq shovel [optional path to rabbitmq_shovel_config.yml


Example of RabbitMQ shovel configuration on v2
shovel: # hostname of remote machine rabbit-1: port: 5671 rpc: # Remote instance name v1: # List of pair of agent identities (local caller, remote callee) - [platform.historian, data.mover] virtual-host: v2 This says that Hplatform historian on v2 wants to make RPC call to DataMover agent on v1. a. On v1, run below command to setup a shovel from v1 to v2.vcfg --rabbitmq shovel [optional path to rabbitmq_shovel_config.yml b. Create a user on v2 with username set to remote agent's username ( for example, v1.data.mover i.e., <instance_name>.<agent_identity>) and allow the shovel access to the virtual host of v2.cd $RABBITMQ_HOME vctl rabbitmq add-user <username> <password> c. On v2, run below command to setup a shovel from v2 to v1vcfg --rabbitmq shovel [optional path to rabbitmq_shovel_config.yml d. Create a user on v1 with username set to remote agent's username ( for example, v2.patform.historian i.e., <instance_name>.<agent_identity>) and allow the shovel access to the virtual host of the v1.cd $RABBITMQ_HOME vctl rabbitmq add-user <username> <password>
Start Platform driver agent on v1
./stop-volttron
vcfg --agent platform_driver
./start-volttron
vctl start --tag platform_driver
Install DataMover agent on v1. Contents of the install script can look like below.
   #!/bin/bash
   export CONFIG=$(mktemp /tmp/abc-script.XXXXXX)
   cat > $CONFIG <<EOL
   {
       "destination-vip": "",
       "destination-serverkey": "",
       "destination-instance-name": "volttron2",
       "destination-message-bus": "rmq"
   }
   EOL
   python scripts/install-agent.py -s services/core/DataMover -c $CONFIG --start --force -i data.mover

Execute the install script.
Start platform historian of your choice on v2. Example shows starting SQLiteHistorian
./stop-volttron
vcfg --agent platform_historian
./start-volttron
vctl start --tag platform_historian
Observe data getting stored in sqlite historian on v2.